

While adding a dedicated to-do list app to your list of productivity tools may seem appealing, it also adds to the clutter and chaos of having to manage multiple apps. Instead of installing and learning a new app, you can use what you already have to create a to-do list. Here are some ways to do it.
1. Create and manage tasks in Google Calendar
Going through the day without a well-thought-out plan is a waste of time. That's why a calendar is the kind of essential app you need for a productive day. Google Calendar is one of the best options available. In addition to scheduling events and appointments, as well as reminding you of birthdays and holidays, Google Calendar also serves as a task manager with Google Tasks integration. This allows you to seamlessly use Google Tasks to organize your life.
Here's how to create a task or to-do list in Google Calendar:
- Open Google Calendar on your computer.
- Click on an empty cell for a specific day and select the tab Task in the pop-up window.
- Add a title, set the time, add a description and click Save.
- Your tasks will be displayed on the calendar. If you don't see the task, check the box Tasks in the left bar to display.

You can also create tasks in tabs Task of Google Calendar – here's how:
- Open Google Calendar on your computer.
- Click the tab Task in the upper right corner of the screen.
- Click Add a task.
- Add a task title and description, then set the date and time.
- You can also split a task into subtasks by clicking the vertical ellipses ⋮ and selecting Add a subtask.

2. Create checklist/to-do list in Google Docs
Checklists in Google Docs are a great way to stay organized and keep track of tasks. Unlike numbered or bulleted lists, checklists allow you to check off completed tasks and keep a visual record of your progress. Plus, it's a simple way to collaborate on lists with others, making them perfect for group projects or shared household tasks.
Here's how to create a checklist in Google Docs:
- Go to Google Docs and open a blank document.
- Enter symbol @ Where you want to place the checkbox, enter Checklist and press Enter. Or, click the icon Checklist on the toolbar to add checkboxes.
- List each item or task on a line and click Enter to add a checkbox to the next line.
- To turn an existing task list into a checklist; highlight the text and click on the icon Checklist on the toolbar.
- To break down large tasks into smaller sub-tasks or create nested checklists, simply place the cursor at the beginning of the line/task and press Tab to indent and create sub-sections.
- Mark tasks as completed by clicking the box next to the task.

Finally, you can insert tables into Docs to create a more streamlined checklist with columns and rows that you can customize to your needs.
3. Turn emails into tasks in Outlook
If you spend a lot of time communicating via email, it can be easy to forget about important actionable tasks mentioned in the email. Luckily, Microsoft Outlook offers a quick and simple way to turn emails into tasks through integration with Microsoft To Do. Using your Outlook inbox as a task manager is a great way to stay organized and reduce email overload.
Here's how to turn Outlook emails into tasks using Microsoft To Do:
- Access your Outlook inbox.
- The fastest way to convert emails into tasks is to mark them up. These emails become tasks in the tab Flagged emails by Microsoft To Do. Hover over the email and click the icon Flag.
- Or, right-click the email and select Advanced actions > Create task. This opens a side panel where you can add more detailed information to the task, such as a due date or reminder.
- You can delete emails once you've marked them or turn them into tasks to clean up your inbox. The task will remain on your to-do list until you mark it as complete.

The best part is that Outlook integrates seamlessly with other Microsoft tools like OneNote, Teams, and Outlook Calendar, allowing you to manage and assign tasks directly from your inbox without the need for a to-do list app. private.
4. Organize your to-do list in Apple Reminders
Using a reminder app or your device's built-in feature is one of the best ways to quickly add daily tasks that you might forget. If you use one or more Apple devices, the Reminders app is a great built-in option for keeping track of to-do lists. So instead of struggling to keep track of multiple productivity apps, you can use Reminders to help keep things organized.
Here are some tips for getting the most out of the Apple Reminders app:
- Organize your reminders (to-do lists) into lists. Lists are like folders and help organize your tasks by categories or projects. You can create multiple lists, such as Personal, Work, Shopping, etc. to easily find tasks to focus on. Open Reminders and click Add List in My Lists.
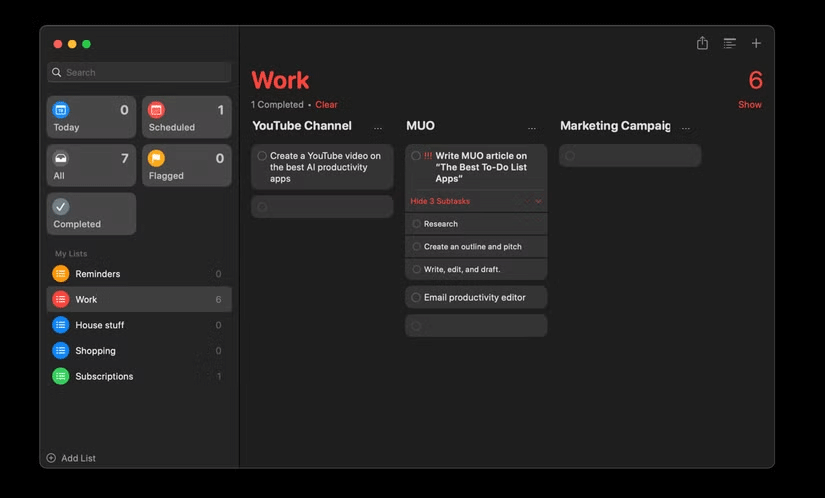
- Create separate Sections in specific reminder lists for different projects. For example, in the Work list, you might have items for different clients or projects like YouTube Channel, Articles, or Marketing Campaigns. Select the reminder list and click the icon Add a new section on the toolbar.
- Create tasks and subtasks in relevant sections of the reminder list. Sub-tasks are a great way to break down large tasks into smaller, more manageable tasks. All you need to create a subtask is to indent a task (reminder) by entering Edit > Indent Reminder.
- Use the View as Columns feature to visualize tasks in a Kanban-style view. This view helps you see all the different sections (columns) in your reminders list and the tasks (reminders) within each section. Go to the menu View and choose as Columns to switch to this view.
5. Create checklist in Apple Notes
While the Notes app may not be the first app you think of when creating a to-do list, it offers a handy feature that can help you keep track of a variety of tasks. You can use checklists in the Notes app to create lists of tasks and check them off as you complete each task.
Here's how to create a checklist in the Notes application:
- Open the Notes app and create a new note or open an existing note.
- Click on the icon Checklist on the toolbar or click the menu Format and choose Checklist to start your to-do list.
- You can create a subtask by indenting a task. Click a line in the list and press Tab to indent.
- Click the circle next to an item to mark it as complete.

6. Create lists in Stickies
As its name suggests, Stickies is a tool that allows you to create sticky notes on your Mac screen. Think of it as a virtual version of a physical sticky note. You can use it to jot down quick reminders, to-dos, or shopping lists. And just like physical notes stuck to your wall or desk, Stickies stay on the screen until you close it.
Here's how to create a list of tasks in Stickies:
- Open the Stickies app. You can access this app in Launchpad or do a Spotlight search.
- Create a new note by clicking File > New Notes or use keyboard shortcuts Command + N.
- Enter your tasks in a new note. Once done, select the text and press Option + Tab on the keyboard to convert text to a list.
- Indent lists to create sub-tasks with keystrokes Tab.
- Unfortunately, there is no built-in option to add checkboxes in Stickies. But you can use formatting Strikethough to mark tasks as completed. Select a task or list, click menu Font and choose Strikethrough.

Downloading the latest, fully featured to-do or task management app may not always be the best approach. Sometimes the solution is all around us, like the apps and websites you're using.
