

Grant permissions to users in SQL Server not difficult. Here it is Instructions for decentralizing permissions in SQL Server.
When it comes to protecting sensitive data and keeping the database environment secure, managing database login rights & privileges will be the focus. For example, you want someone to be able to edit and manipulate personal data, and another person to only be able to view the data. In this case, the database administrator will need to create a new user or role with specific permissions assigned at that server, database or schema level. To perform this task, they can use T-SQL commands provided by SQL Server or third-party tools.
Actually, creating a new login in SQL Server is not difficult. First, you need to create a new login based on Windows authentication, SQL Server, certificate or an asymmetric key.
To add a new login, use the CREATE LOGIN command. It creates a login that is connected to the SQL Server instance. This login will then be mapped to the specific user account. Its syntax is as follows:
Windows Authentication
CREATE LOGIN login_name
FROM WINDOWS
[ WITH DEFAULT_DATABASE = database_name
| DEFAULT_LANGUAGE = language_name ];
SQL Server authentication
CREATE LOGIN login_name
WITH PASSWORD = { 'password' | hashed_password HASHED } [ MUST_CHANGE ]
[ , SID = sid_value
| DEFAULT_DATABASE = database_name
| DEFAULT_LANGUAGE = language_name
| CHECK_EXPIRATION = { ON | OFF }
| CHECK_POLICY = { ON | OFF }
| CREDENTIAL = credential_name ];
Certificate
CREATE LOGIN login_name
FROM CERTIFICATE certificate_name;
Asymmetric key
CREATE LOGIN login_name
FROM ASYMMETRIC KEY asym_key_name;
Limits and restrictions you need to know before decentralizing
Decentralize permissions or roles, not individual logins or users. When replacing a delegated person, it means removing an individual from that role and replacing it with a new person. You can combine multiple permissions for a role. If several people in your company or organization need the same permissions, add them to that role one at a time.
Configure the same security (table, viewer, and process) to be owned by a schema, then grant permissions to that schema. For example, a payroll schema may own several tables, views, and stored procedures. By granting access to the schema, all permissions needed to perform payroll functionality can be granted at once.
If the above limitations are not a problem for you, you can immediately apply the following ways to decentralize MS SQL Server users:
You can assign permissions in SQL Server and revoke them on different database objects. User permissions are always at the database level.
You can grant any or a combination of the following types of permissions:
- Select: Grants users the ability to implement select operations on tables.
- Insert: Allows users to perform data insertion operations on the table.
- Update: Grants the user the ability to perform table update operations.
- Delete: Grants the user the ability to perform delete operations on the table.
- Alter: Grants users the ability to change table definitions.
- References: Reference permission required for creating foreign key constraints on the table. It is also necessary to create a function or View WITH SCHEMABINDING statement that references that object.
- Control: Grant SELECT, INSERT, UPDATE, DELETE and REFERENCES permissions to users on the table.
Similarly, you can revoke any granted rights.
You can grant or revoke permissions using SSMS or running a T-SQL script. Below are detailed instructions.
Method 1: Use T-SQL
Syntax:
UseGranton
For example:
To assign selection rights to the user named TestUser on the object TestTable on the database named TestDB, run the query below.
USE TestDBGOGrant select on TestTable to TestUser
Method 2: Use SQL Server Management Studio SSMS
Step 1: Connect to the database, expand the folder as shown in the image below.
 Open the Security > Users folder and find the user name you want to authorize
Step 2: Right click TestUser and choose Properties. The screen below will appear.
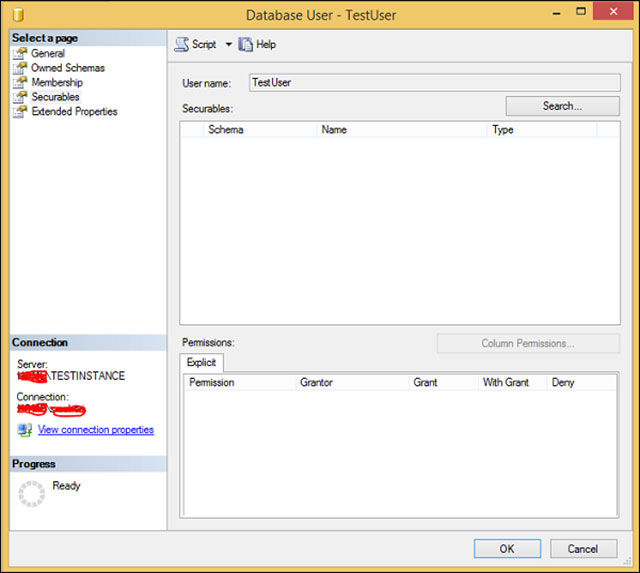
TestUser user management screen
Step 3: Use Search to search then select the object you want to decentralize, here is the table TestTable.
Step 4: Click to select table TestTable, then select the checkbox Grant for the operations in the list below as shown in the image below. In this example, the right to choose the table is given (Select).
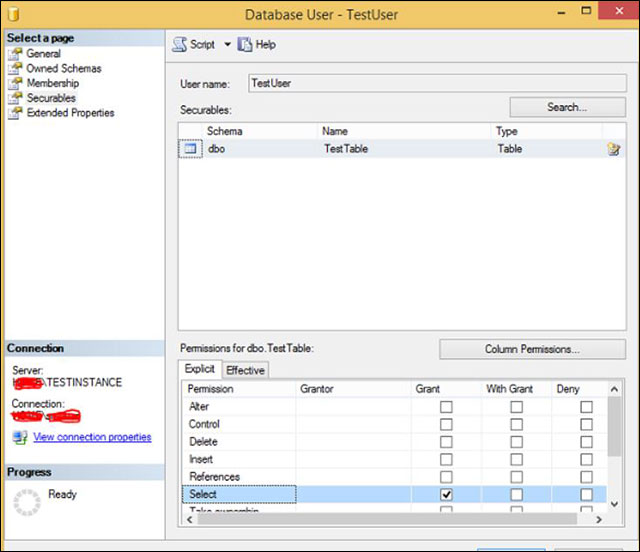
Tick the authorization box
Step 5:Click OK to complete the decentralization.
Previous article: How to create users in MS SQL Server
Next article: Database management in MS SQL Server
