

ChatGPT Voice has just been updated with the screen sharing feature, open the application or screen you want to ask ChatGPT about. Users can then transmit video directly to ChatGPT quickly, without needing to take the additional step of recording screen video from outside. Note, the screen video sharing feature with ChatGPT Voice is currently only available for Teams, Plus and Pro users. Below are instructions for sharing screen videos with ChatGPT.
How to share screen video with ChatGPT Voice
Step 1:
At the ChatGPT interface, click ChatGPT Voice icon below. Switch to the new interface, the user clicks 3 dots icon then select Share Screen.

Step 2:
Display notification interface, friend Click Start Now to record screen video. This time you Record video of the application screen with the content you want to ask ChatGPT Voice okay. Be careful not to reveal your personal information or content so that ChatGPT does not record screen videos.
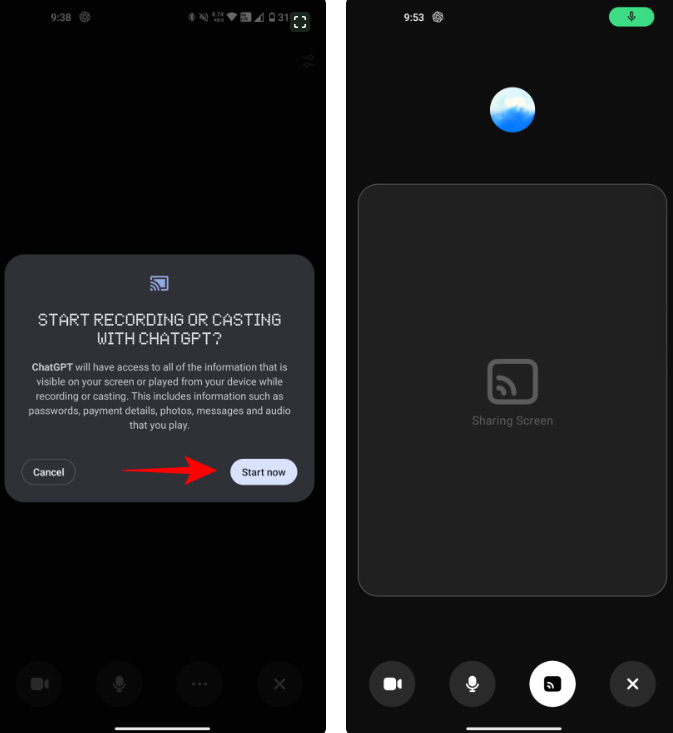
After the screen recording is completed, press the screen recording icon to stop. The screen video will display immediately in the ChatGPT Voice messaging interface to start chatting with ChatGPT Voice.
Instructions for Sharing Screen Video with ChatGPT Voice
Sharing a screen video while interacting with ChatGPT Voice is an excellent way to create tutorials, demonstrate software, or showcase workflows. Below is a step-by-step guide to help you achieve this efficiently.
1. Set Up Your Equipment and Environment
Before recording, ensure you have the necessary tools and an appropriate environment:
Required Equipment
- Device: A laptop, desktop computer, or tablet with screen-sharing and recording capabilities.
- Microphone: A built-in or external microphone for clear audio capture.
- Stable Internet Connection: Ensure reliable connectivity for seamless interaction with ChatGPT.
- Recording Software: Use screen recording tools such as OBS Studio, Zoom, Loom, or native features like Windows Game Bar or macOS Screenshot.
Environment Setup
- Quiet Space: Minimize background noise for clear audio.
- Organized Desktop: Close unnecessary apps and tabs to avoid distractions and maintain privacy.
- Lighting: Ensure proper lighting if you plan to include webcam footage.
2. Enable ChatGPT Voice
- Log In to ChatGPT: Access the platform via a web browser or app.
- Activate Voice Feature:
- Go to settings and enable the “Voice Interaction” option.
- Select a voice type that aligns with your recording purpose.
- Test the Voice Functionality: Initiate a trial interaction to verify voice clarity and responsiveness.
3. Set Up Screen Recording
Choose a Screen Recording Tool
- OBS Studio: Free, highly customizable, and suitable for advanced users.
- Zoom or Google Meet: Ideal for live presentations with recording options.
- Loom: Easy to use for quick screen recordings.
- Native Tools: Windows (Game Bar) or macOS (Screenshot and Recording).
Configure the Recording Settings
- Resolution: Set to at least 1080p for clear visuals.
- Frame Rate: Use 30fps or higher for smooth motion.
- Audio: Select your microphone for input and system audio to capture ChatGPT responses.
4. Start Screen Sharing and Recording
Launch the Recording Tool
- Open your chosen recording software.
- Select the screen or window you wish to share (e.g., browser with ChatGPT).
- Ensure both system audio and microphone audio are enabled.
Initiate Screen Sharing
- If using tools like Zoom or Google Meet, click “Share Screen” and choose the relevant application or desktop.
Begin Recording
- Start the recording feature within the tool.
- Ensure a countdown timer (if available) to align your actions seamlessly.
5. Interact with ChatGPT Voice
- Activate ChatGPT Voice: Click the microphone icon and speak your queries or commands.
- Demonstrate Tasks:
- Show on-screen actions, such as navigating websites, using software, or explaining processes.
- Speak clearly and at a moderate pace to allow ChatGPT to process your queries and provide audible responses.
- Engage Naturally: Use conversational language to make the interaction engaging and relatable.
6. Enhance the Presentation
Use Annotations
- Most recording tools provide options to highlight areas, draw, or add text in real-time. Use these to emphasize key points.
Switch Views
- Alternate between full-screen sharing and split views (screen + webcam) for a personal touch.
Reiterate Key Points
- Summarize responses or explain additional context to enhance understanding.
7. Conclude and Save the Recording
- End the ChatGPT Session: Politely thank ChatGPT to wrap up the interaction.
- Stop the Recording: Ensure the recording tool has stopped capturing and saved the file.
- Review the Video: Play back the video to check for quality, clarity, and completeness.
8. Edit and Optimize the Recording
Editing Tools
- Use software like Adobe Premiere Pro, iMovie, or DaVinci Resolve for advanced editing.
- For simpler edits, use built-in editors or apps like CapCut or Camtasia.
Enhancements
- Trim: Remove unnecessary parts.
- Subtitles: Add captions for better accessibility.
- Transitions and Effects: Include smooth transitions or highlights to enhance the video.
Export Settings
- Choose an appropriate format (e.g., MP4) and resolution (1080p or higher).
9. Share the Video
Upload to Platforms
- Share on platforms like YouTube, Vimeo, or social media for broader reach.
- Use a private link-sharing option for restricted access if needed.
Embed or Send Directly
- Embed the video in a website or presentation.
- Send it via email or messaging apps for personal sharing.
Tips for Successful Screen Video Recording
- Plan Ahead: Outline the content and flow of your interaction.
- Test the Setup: Conduct a trial recording to ensure all components work.
- Engage the Audience: Use relatable examples and encourage feedback.
- Maintain Privacy: Avoid sharing sensitive information on-screen.
- Monitor Quality: Continuously check audio and video clarity.
By following these steps, you can efficiently record and share a screen video while using ChatGPT Voice, delivering engaging and informative content to your audience.
